


 EN
 ไทย


Customers Also Purchased
If you have ever installed Self Tapping Screws Then the screw drives in crooked, the head countersinks unevenly, the workpiece twists, or worse, the screw snaps halfway through. You are not alone! This is one of the most common issues our team hears about from both customers and professional tradespeople on-site. To outsiders, "driving a screw" might seem simple: just touch the tip to the surface, press the tool, and drive it in.
In reality, self-tapping screws respond directly to how they are used. If posture, hand pressure, angle, or tool selection is off by even a fraction, the consequences show up immediately as crooked screws, twisted heads, stripped heads, or damaged threads beyond repair. In this article, our technician team walks you through each aspect step by step. If you want to drive self-tapping screws straight, neat, secure, and without wasting time redoing work, here is what you need to pay attention to—from preparation and screw initiation to driving and finishing—so you can apply it directly to real on-site work, not just in theory.
Why Do Self-Tapping Screws Go Crooked Even When You Aimed Straight?
Our technicians encounter this question very often, and the answer is usually not just about having an "unsteady hand." In reality, self-tapping screws can tilt due to several interacting factors—from the material being driven into, surface hardness/softness, sharpness and shape of the screw tip, screw head design, to the torque and responsiveness of the tool used.
An important thing many people overlook is that self-tapping screws do not just "rotate into the material"; they also have to cut through the material and form thread grooves simultaneously right from the first revolution. If the initial cutting is unbalanced—for instance, if the screw tip bites into one side more than the other—the resulting thread groove acts like a guide rail, instantly deflecting the screw axis away from the perpendicular. Once the screw starts following that groove, even if you try to push or correct the angle later, it is virtually impossible to pull it back onto the original straight line.
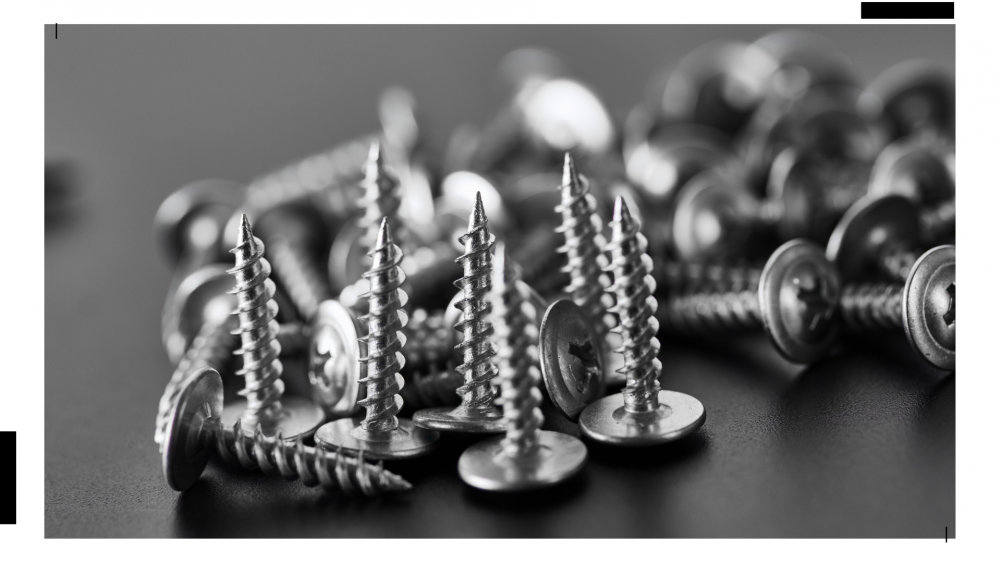
Starting Angle for Driving Self-Tapping Screws: The Critical Point Determining Whether the Screw Drives Straight or Tilts
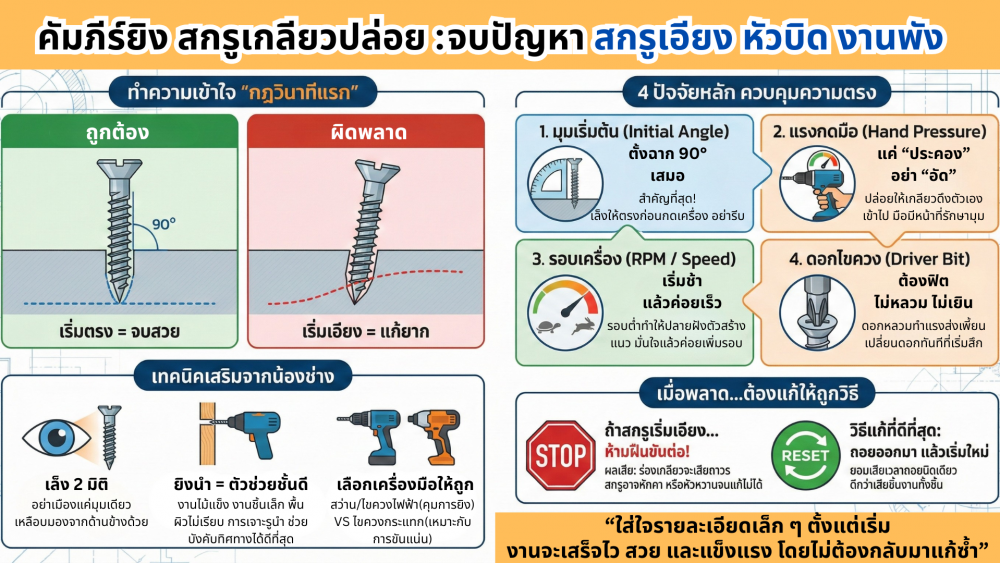
Many people make a mistake right from the very first second the screw tip touches the workpiece. This starting phase is the moment the self-tapping screw begins biting into the material and carving its own path. If you start driving without maintaining a roughly 90-degree perpendicular angle to the surface—even with just a slight tilt—the threads on one side will immediately bite into more material than the other, causing the thread groove to deflect off the straight axis from the very first turn.
Once the thread path starts acting as a guide track, the screw is forced to continuously follow that direction. Even if the user attempts to adjust their wrist or push the tool straight later on, there is virtually no chance of realigning the screw. That is why a screw that starts out tilted tends to slant further and further, becoming clearly noticeable as it penetrates deeper.
What professional tradespeople pay special attention to is angle control during the starting phase. They do not rush to press hard immediately; instead, they position the screw tip perpendicular to the workpiece first, apply light downward pressure to hold the position, and then start rotating at low RPM. This allows the screw tip to gradually bite in and form a balanced thread groove on both sides. Once confident that the screw is standing upright, they gradually increase the speed and torque accordingly.
Hand Pressure: Too Much Causes Damage, Too Little Causes Tilting
This is another point that is most commonly misunderstood. Many people automatically believe that applying heavy pressure will drive the screw faster, tighter, and straighter. In reality, excessive downward pressure causes the screw tip to lose control, especially during the initial phase when the threads haven't yet formed a balanced pilot groove. The screw tip might slip, bite into the wrong position, or gouge one side too much, causing the thread path to veer off-axis right from the start.
In hardwood applications, excessive pressure can crush or split the wood around the hole entrance, causing the screw to wander crookedly and reducing holding power. In thin sheet metal work, excessive compressive force can bend the sheet, distorting the workpiece and throwing the screw off-track almost without the user noticing.
Conversely, applying too little pressure prevents the screw tip from biting firmly into the material. The threads will spin freely at first, causing the screw to wobble or tilt before it properly embeds. Once the screw starts slanting, the resulting thread groove will continue to guide the screw off-course.
Proper downward pressure should therefore act as "support" rather than "forceful compaction." The user should primarily let the screw threads do the work of cutting and drawing themselves into the material, while the hand is responsible for keeping the angle perpendicular, controlling direction, and adjusting pressure to match the thread engagement. Once the screw begins embedding firmly, it indicates that the applied pressure is at the sweet spot.
Tool Speed: The Silent Enemy of Straight Screwdriving
Starting to drive a self-tapping screw at high RPM right away is one of the main culprits behind tilted screws, stripped heads, and ruined threads—especially when using an impact driver or high-torque drill. When the tool runs at high speed from the start, before the screw tip has a chance to bite or form a secure thread groove, the aggressive rotational force can cause the screw to wobble, generate oblique forces, and easily veer off-track.
In practice, high RPM causes the material cutting to occur aggressively and unevenly. The threads on one side may bite faster than the other, resulting in a tilted thread groove right from the initial phase. Once this groove acts as a guide rail, the screw is forced to follow that path all the way through, even if the user tries to ease off hand pressure or adjust the angle later.
Skilled tradespeople who achieve neat, controlled fastening therefore place great emphasis on managing tool speed. They start at low or medium RPM to let the screw tip gradually embed and establish a balanced thread path first. Once confident that the screw is upright without wobbling or deflecting, they gradually increase speed or torque to tighten it down at the end. This method significantly reduces the risk of tilted screws and stripped heads, while noticeably extending the life of both screws and driver bits.
In other words, tool speed is not just about rapidity—it is a critical factor that governs the direction, straightness, and quality of self-tapping screw fastening from the very first second.
Driver Bits: An Overlooked Detail That Directly Affects Screw Straightness
The screwdriver bit is the critical link between the power tool and the screw. If the bit does not fit the screw head profile precisely, rotational force from the tool will not transfer down the screw axis in a straight line. Instead, it creates continuous micro-cam-out and off-axis deflection forces during rotation, which is a major factor causing screws to tilt early on—even if the user keeps the tool angle relatively straight.
A loose driver bit or one mismatched with the screw head type—such as using a Phillips bit that is too small or too large—prevents the bit tip from fully engaging the screw recess. Once rotation begins, torque is transferred unevenly, causing slipping or wobbling that skews the screw head and knocks the screw axis out of alignment.
Additionally, driver bits that have been used for a long time and developed rounded or worn tips diminish screw control even further. Worn bits easily slip out of the screw head recess (cam-out), strip heads more quickly, and compel the user to press harder subconsciously, thereby increasing the risk of tilted screws or damaged threads.
Craftsmen who drive screws straight with neat results place just as much importance on choosing the screwdriver bit as they do on the screw itself. They choose a bit that fits snugly into the screw head without any play, constantly check the condition of the bit tip, and replace the bit immediately once they feel the screw is becoming harder to control. In practice, a bit in perfect condition is a key factor in keeping the screw driving straight right from the first turn.
Uneven Work Surface = Unavoidable Slant?
Curved, sloped, or uneven surfaces—such as warped wood, knotty wood with inconsistent hardness, thin sheet metal, or loosely clamped workpieces—are all factors that make it very easy for self-tapping screws to start off at the wrong angle. During the initial stage of driving, the screw relies on resistance from the surface to steady its alignment; if that resistance is uneven, the screw is forced off course almost without the user noticing.
In the case of warped wood or wood with uneven density, the screw tip naturally follows the path of least resistance, causing the threads to bite faster on one side and skewing the groove path right from the start. On thin sheet metal, if the workpiece is not firmly clamped, the downward pressure of driving will cause the sheet to flex or shift, constantly altering the screw angle during rotation.
Craftsmen with good technique do not immediately drive screws when encountering these surfaces; they always prepare the workpiece first. Whether clamping it firmly, repositioning the surface into a controllable plane, or drilling a small pilot hole to establish a clear, stable starting point. A pilot hole acts as a guide channel to keep the screw straight, minimizes the influence of curvature or shifting, and ensures the self-tapping screw is driven under control right from the first turn.
Pre-drilling: How Necessary Is It?
There is no single definitive answer, as it depends on the material type, thickness, application, and desired level of neatness. But based on on-site experience, pre-drilling is one of the most effective ways to prevent slanted screws, especially when working with hard materials, thick stock, or high-precision assemblies.
A small pilot hole acts like a "guide channel" for the screw tip to start in a controlled position. The threads don't have to forcefully cut through all the material on the first turn, balancing the bite on both sides and significantly reducing wobbling or deflection during the start.
In hardwoods, structural framing, or driving near the edge of a workpiece, pre-drilling also minimizes the risk of wood splitting or cracking around the hole, which is another hidden cause of screws going crooked. Many professional craftsmen choose to pre-drill whenever both strength and appearance matter, rather than driving blindly and hoping for the best.
Tools: Drill vs. Impact Driver – Which Is Easier to Keep Straight?
In terms of controlling angle and straightness, a drill or an electric screwdriver with fine speed control offers greater precision when starting a screw. The user can smoothly manage low speeds and torque, giving the screw tip time to embed and balance its threading path.
While impact drivers excel in high torque and speed, the initial impacting force can easily cause the screw to wobble or veer off course, especially for fine work or smaller screws. For this reason, many craftsmen use a hybrid method: starting the screw with a drill or electric screwdriver at low speed to establish a straight line and angle, then switching to an impact driver at the end to tighten it down. This technique effectively prevents both crooked screws and stripped screw heads.
How Screw Length and Size Affect Straightness
Long screws with slender shanks or thin metal bodies are more prone to bending or wobbling during driving than shorter screws or those with thicker shanks. Once a screw begins to flex, the applied force deviates from the central axis, tilting the threading path and making direction harder to control.
If you choose a screw longer than necessary, this problem becomes even more pronounced, especially in materials with uneven resistance like wood or thin panels. Selecting a screw length suited to the actual material thickness helps the screw self-center easily, drives threads steadily, and reduces strain on both the fastener and the tool, resulting in a straighter, cleaner finish.
Small Pro Tips Craftsmen Use (That Few Talk About)
These techniques don't require expensive tools or complicated procedures; they are subtle nuances gained through hands-on experience that directly influence screw straightness, usually absorbed naturally by those who work with tools every day.
- Sight from Two Angles, Not Just One Professional craftsmen don't just eye a screw head-on from a single angle; they glance from the side or slightly shift their head position to verify that the screw axis is truly perpendicular to the surface. This minimizes optical illusions caused by a single perspective, particularly on uniform or monochromatic surfaces.
- Always Start Slow, Even When Rushed Even when rushed or under tight deadlines, a skilled tradesman in control won't rush at the start, because they know well that making a mistake on the first turn wastes far more time later. Starting slowly allows the screw to seat itself and establish a balanced thread path before ramping up the speed once control is secured.
- If it feels crooked, stop and fix it early—don't force it The tactile feedback from your hand and the tool's resistance are critical signals. If you feel the screw starting to wobble or lean, an experienced technician will stop immediately instead of trying to push it straight, knowing that forcing it will damage the threads and reduce holding power. Backing out to start fresh from the beginning consistently yields better long-term results.
- Change the bit immediately if it feels loose A driver bit that becomes loose, worn, or fails to grip the screw head securely makes angle control noticeably more difficult. A professional tradesman doesn't wait for the screw head to strip before changing it; they replace the bit as soon as the power transfer starts feeling inaccurate, knowing a perfect bit is the foundation of straight, clean work.
These techniques might seem trivial at a glance, but on actual job sites, they are the details that cut down on rework, save time, and clearly draw the line between work that looks neat from the start and work that needs fixing later.
What to do if a screw goes crooked?
If a screw starts driving crooked, the first thing to do is stop. Do not try to force it further or muscle it straight, because once the threads begin biting into the material at the wrong angle, that newly formed thread path acts as a permanent guide, forcing the screw further and further off-track. Forcing it to drive not only keeps it crooked, but also significantly reduces the thread's holding power and raises the risk of snapping the screw or stripping the head toward the end.
The best approach is to back the screw out and start over—resetting your angle, checking your downward pressure, and controlling the tool's speed. If you find the original thread hole is stripped or damaged, move the driving location slightly or drill a pilot hole to establish the proper path before driving again. While this may seem like more time lost in the short term, it preserves the workpiece's structural integrity and eliminates long-term issues far better than forcing an on-the-spot fix.
In structural applications or work where surface finish is critical—such as furniture, installations with visible screw heads, or load-bearing points—spending a little extra time to fix it early is far better than leaving a crooked screw and hoping it won't cause issues later. In practice, a crooked screw from the start is often the root of problems in both strength and aesthetics.
Drive self-tapping screws straight to finish the job right the first time
At first glance, driving Self Tapping Screws might seem like the most trivial step in construction, but from real on-site experience, this small detail often creates the biggest headaches. Crooked screws, stripped heads, ruined threads, or insufficient holding strength all stem from overlooking basic fundamentals—from the initial angle and applied hand pressure to tool speed, as well as choosing the right screwdriver bit and tools for the job.
Driving self-tapping screws straight isn't about brute hand force, heavy-duty tools, or speed; it's about understanding how the screw and material interact. When you control the angle on the first turn, apply proper downward pressure, start at a low speed, pick a well-fitting bit, and decide to stop and correct issues right when they appear, your work will turn out clean, solid, and free of subsequent rework. Whether for home DIY projects or commercial professional jobs, these principles apply equally. In the end, the quality of your work isn't judged by how fast you drove the screws, but by its neatness, durability, and the peace of mind that once the job is finished, you won't have to come back to fix it.
Once you start prioritizing driving self-tapping screws properly from the start, completing jobs becomes easier, your tools yield far more value, and your overall work experience will noticeably improve. In the trade, a job that looks great from the very beginning always starts with paying attention to the small details that many overlook.